To practice our music at home, Siskiyou Singers uses a digital audio workstation (DAW) called BandLab. It is similar to the Soundtrap platform that we have used for the past several years, but testers have found BandLab to be somewhat more responsive, and it eliminates some behind-the-scenes headaches that Soundtrap caused.

BandLab works in a web browser (www.bandlab.com) and should look pretty much the same whether you’re using a Windows or Mac desktop/laptop computer, or an Apple or Android phone or tablet. You will also need an active internet connection, either wifi or cellular, the faster the better.
You can also download a BandLab app from the iPhone or Google Play app stores, but the interface on the app is somewhat different than the web version. So be wary.
Getting Started
The main thing to know is that every song that the choir will be performing has its own separate Project page and Studio page on BandLab. The Project page is like an overview of the song, while the Studio page offers more control. Much more about this later.
At the start of the season, Mark sends each singer an email invitation listing all of the songs and their associated links on BandLab. Clicking a link will open the BandLab site in your web browser.
The first time you’ll do this, you’ll need to create an account on the website (click on images to enlarge):
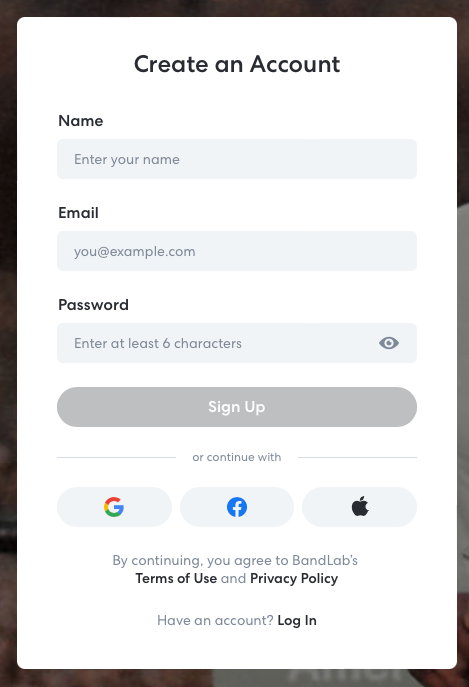
You can either enter your name and email and create a password, or you can use your existing Google, Facebook, or Apple account by clicking the appropriate icon. After you do this, BandLab will present a series of boxes asking you about your musical preferences, which instruments you play, and so on; these questions are intended for people who are looking to connect with other musicians, so you can ignore them if you wish.
Once you have registered and signed in, you’ll be taken to the Studio page for the particular song link you clicked on in Mark’s email. It will look something like this:
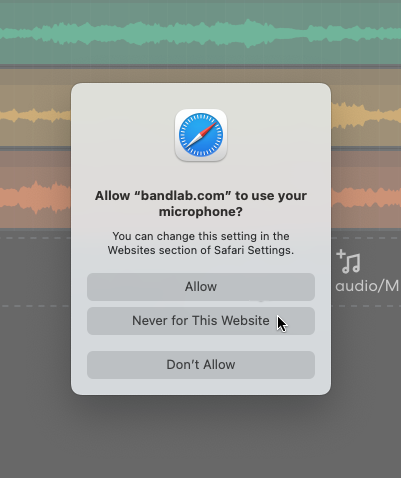
Note: You might be presented with a box (it might look different than the one below) asking whether you want to allow BandLab to access your computer’s microphone. This is necessary only for musicians who are recording their own tracks—but that’s not us, since we’re using BandLab strictly for practice using tracks that Mark has recorded. So click Don’t Allow or, if it is offered, Never for This Website (the latter lets you avoid having to make the choice for every song the first time you open it).
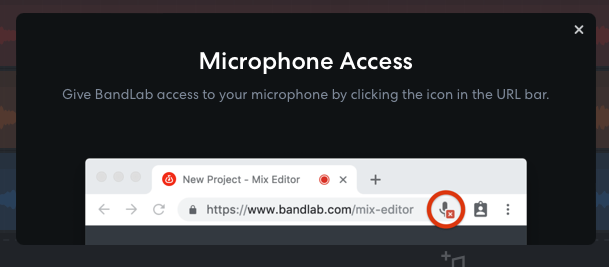
Sadly, BandLab will continue to tell you how to use the microphone every time you open a Studio page. Just click the “X” to dismiss the message.
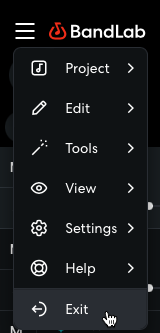
We’ll come back to the Studio page a little later. For now, you can leave the page by clicking on the three horizontal lines in the upper-left corner (it’s called the Hamburger among user-interface folks) and selecting Exit.
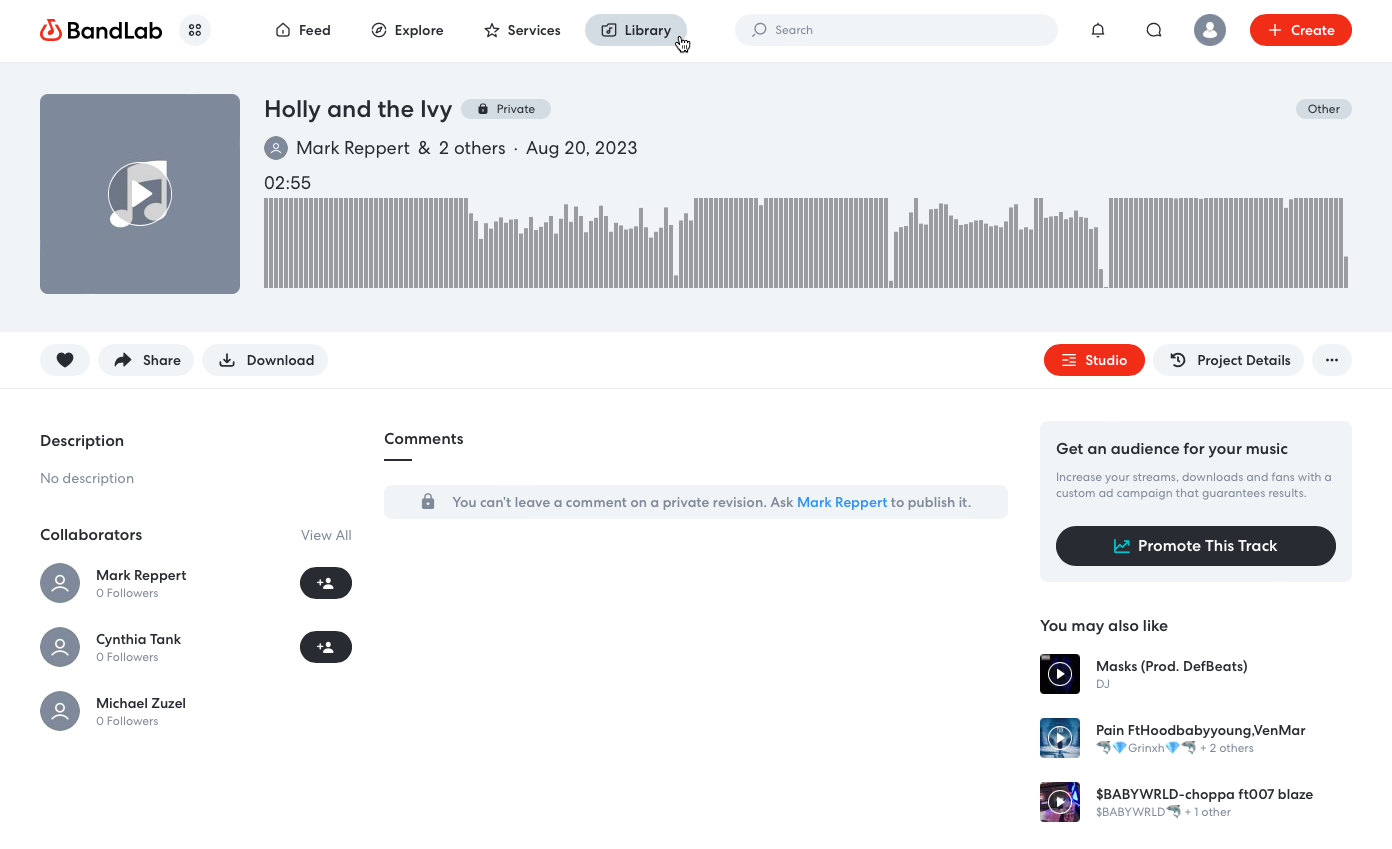
You’ll be taken to the Project page for the same song. It will look something like this:
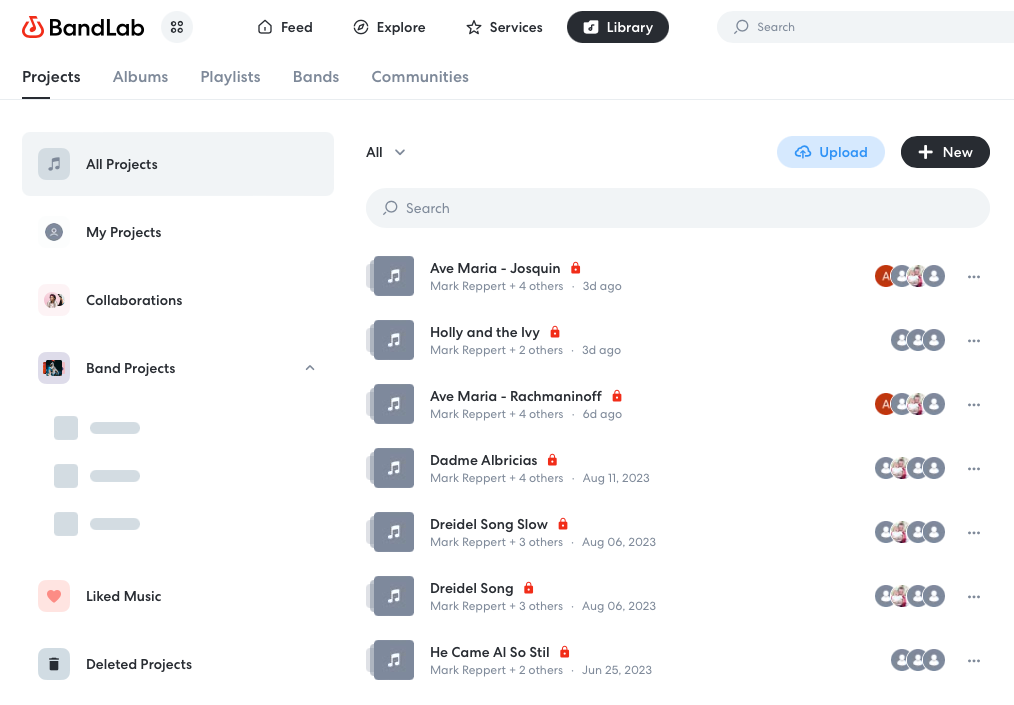
Again, more on this page in a bit. For now, if you click on the Library button along the top, you’ll see the list of all the songs you’ve connected to so far (which at this point will be just this first one). Note: Your browser might not display the word “Library,” but just look for the file folder icon with the musical note inside.
Return to Mark’s email and repeat the above steps above for each song, and eventually your library will start to look like this:
From now on when you want to practice, log in to the BandLab site, navigate to the Library and click on the song title you want. When you do, you’ll arrive at …
The Project Page
As mentioned previously, the Project page provides an overview of the song: its length in minutes and seconds, a list of other singers (Collaborators) who have added the song to their Library, and any comments that singers or Mark have left regarding the song. You can also play the song from this page by clicking the white Play Arrow in the large gray box with the musical notes on the left.
The challenge of practicing on this page is that you’ll hear all the parts (SATB) at the same volume, which can be frustrating, especially when you’re just starting to learn the song.
To fine-tune your rehearsal experience, click on the Studio button on the right (it’s red in this illustration, but after a recent update the button is now gray), which will take you to …
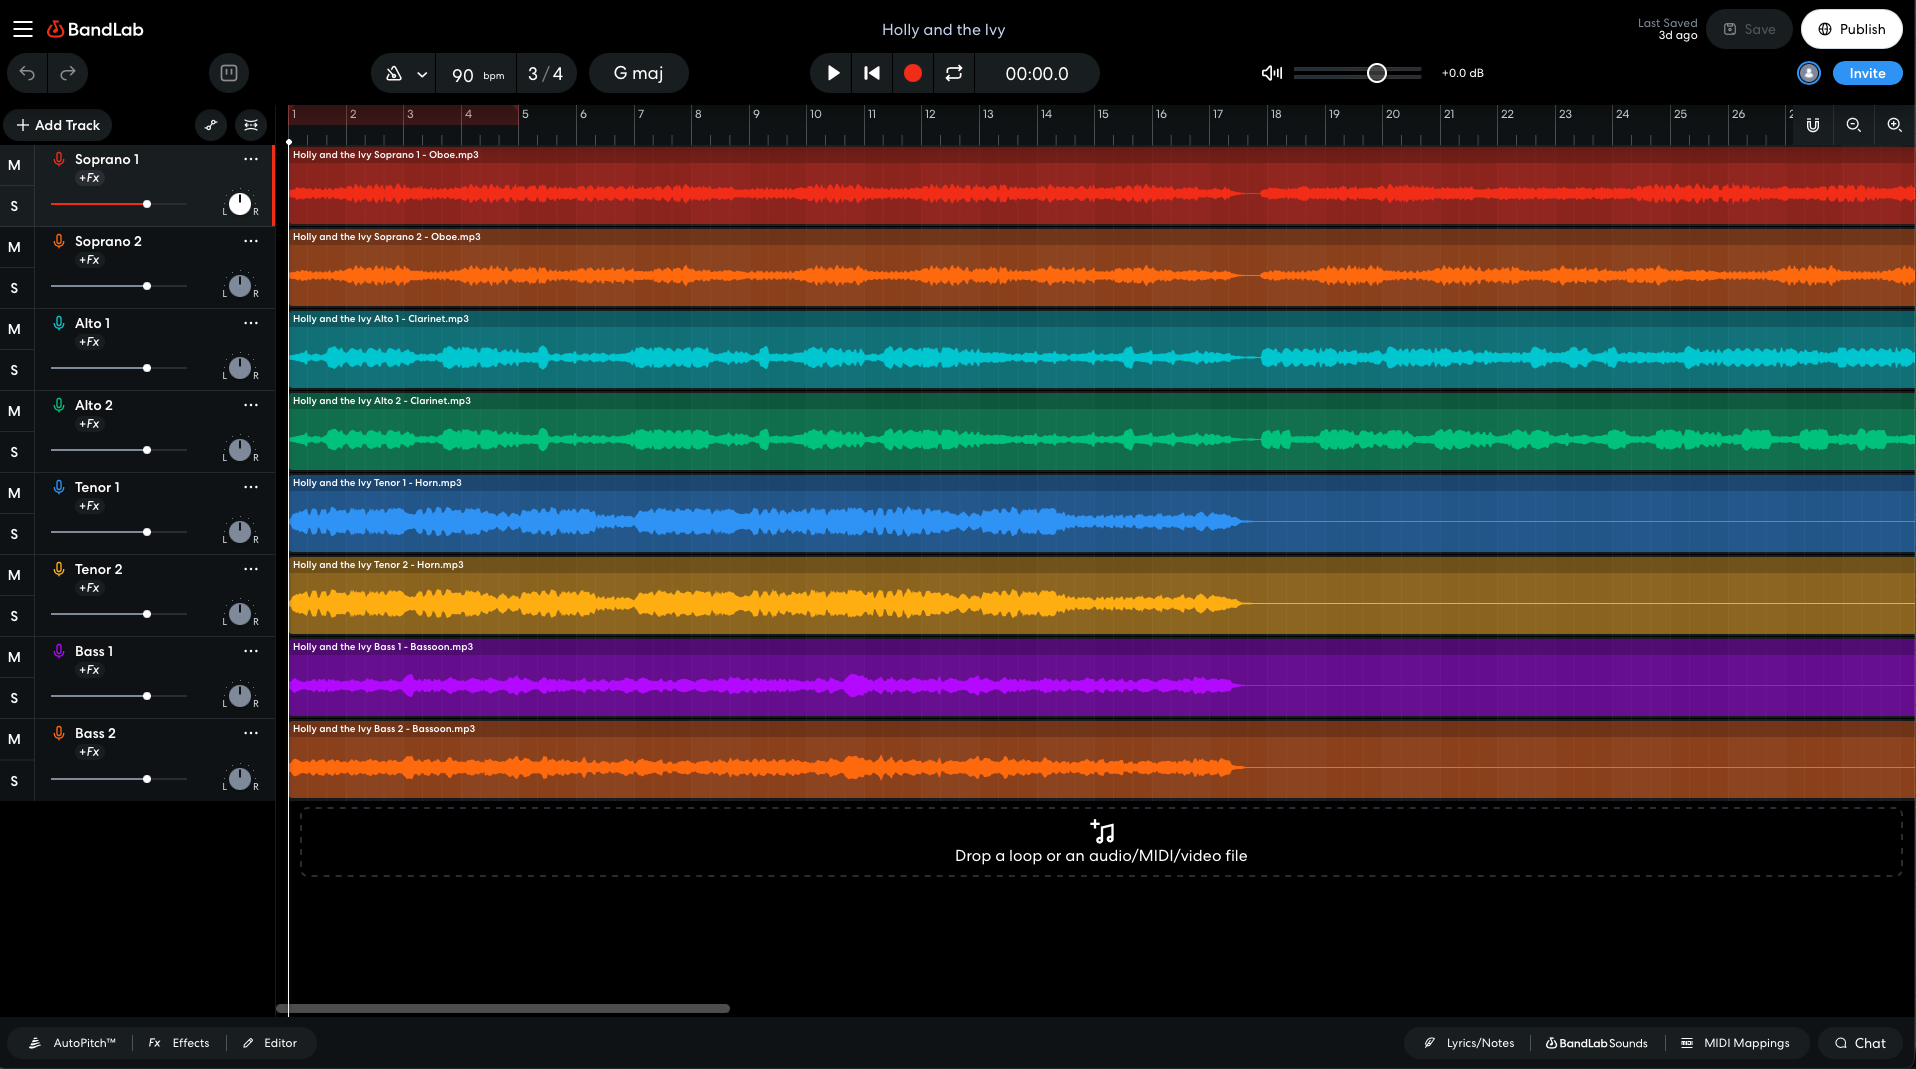
The Studio Page
This is where the action is. This page offers a detailed look at, and multiple controls for, the specific song. Again, the page looks like this:
The Studio page is a visual representation of the song. The white vertical line is the Playhead, which moves from left to right as the song plays. There is a different colored stripe for each SATB part; within each stripe is a squiggly line that shows where the vocal part gets louder or softer.
Along the left column are the names of the individual parts and controls you can use to customize your rehearsal experience:
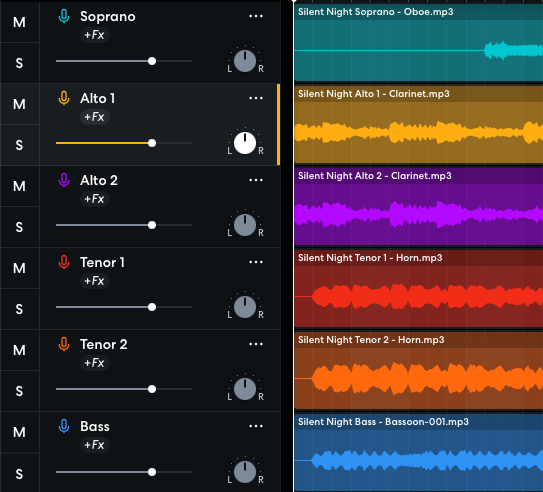
- Mute (the letter M): Click this to mute a specific track. Click again to unmute.
- Solo (the letter S): Click this to mute all of the other tracks. Click again to unsolo.
- Volume (slider below track name): Click and hold on the white dot, then drag to the left or right to adjust the volume of a specific track.
- Balance (dial to right of Volume): Adjust the balance of the track between left and right channels (useful only if you’re using stereo speakers or headphones). Click and drag up or down from the center of the circle.
- Pay no attention to the +Fx symbol, which we won’t use. You can also ignore the three-dot symbol (called the Meatballs) to the right of the track name, which offers specific options that only Mark will use.
Centered in a strip above the sound tracks are controls that apply to playback of the entire song:
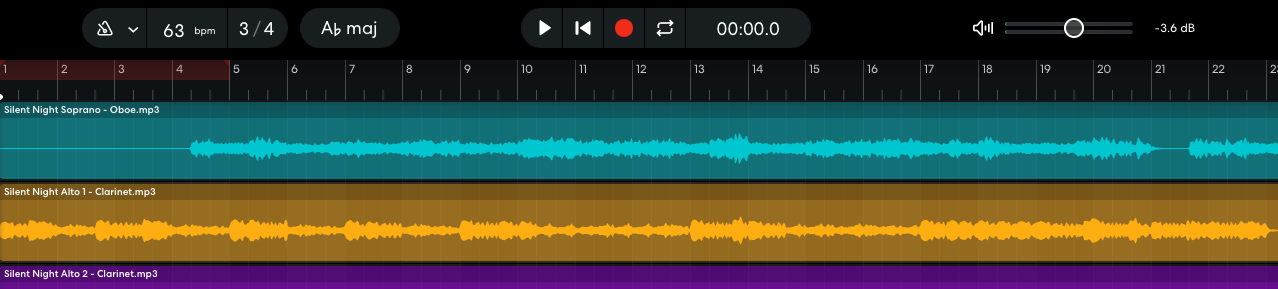
- LEFT GROUP: Metronome, Tempo (bpm), Time Signature and Key Signature: You can turn the Metronome on and off by clicking on the icon. However, do NOT change the tempo or time/key signatures. (For uptempo songs, Mark provides separate, slowed-down versions to help us practice.)
- MIDDLE GROUP:
- Play/Pause (right pointing triangle/pause symbol): If you have a keyboard, you can hit the spacebar to Play, shift-spacebar to Pause.
- Go to Beginning (line and left pointing triangle): Returns the playhead to the start of the song.
- Record (red dot): Don’t EVER click this!
- Cycle (two curly arrows): Allows you to select a section of the song and replay it in a continuous loop. There’s an easier way to do this on a desktop or laptop computer (instructions below). If you’re using a phone or laptop, click here.
- Timecode: Reflects, in elapsed minutes and seconds, the current position of the playhead.
- RIGHT GROUP: Master Volume (drag left or right to adjust the volume of all tracks) and Decibel Level (useful only if you are an audio engineer).
You can ignore the icons on the far left and right of these controls.
Conducting Your Practice Session
- Log in to BandLab (www.bandlab.com), go to your Library, and select the song you want to practice. On the Project page for the song, click on Studio.
- On the Studio page, decide which tracks you want to hear as you practice the song. You may wish to start with only your own SATB part and accompaniment (if any), and add the other parts later once you’ve learned your own.
- Click the Play button and listen to the tracks you’ve selected. You can adjust the volume of individual tracks with the Volume control under the name of each track. Adjust the overall volume with the Master Volume control.
- If you want to start again from the beginning, click Stop and then Go to Beginning. If you want to skip to a specific section of a song, you can click and hold the Playhead and drag it to wherever you want it.
- If you want to work on a specific section of a song, move the Playhead to the beginning of the section and hit the space bar. When you reach the end of the section, hit the spacebar again, and the playhead will return to the start point; hit it again, and the section will begin playing again. Repeat as often as you like. (Note: This shortcut works only if you are using a desktop or laptop computer with a keyboard. If you’re using a phone or tablet, click here.)
- When you are finished rehearsing a particular song, click the Hamburger in the top left corner and select Exit. You’ll be taken back to the Project page for the song; from there you can click on Library to work on another song.
- SHORTCUT: You can move directly from one song’s Studio page to another’s (bypassing the Project page for each) by clicking on the Hamburger, selecting Projects, then Recent Projects, then the title of the song you want. If that song isn’t listed, however, you’ll need to select Don’t Save …, which will take you to the full song list on your Library page.
The Importance of NOT Saving
When rehearsing with BandLab, singers should avoid saving any changes they have made (to volume levels, cycle selections, or anything else) so that the next person to use the project isn’t forced to undo those changes.
Unfortunately, BandLab sometimes makes it hard not to save. The program was designed for collaboration in songwriting, so it’s a feature, not a bug, that saving changes is practically forced on users.
Here are some tips to avoid saving changes:
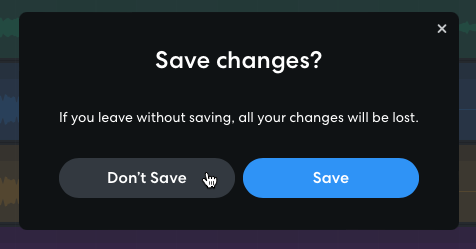
- When leaving a song, if you are confronted with a message asking you to save, always click Don’t Save.
- When you open a song, if it asks you whether you want to save changes from a previous session, click No or Don’t Save.
- Avoid clicking the Save or Publish buttons in the top right corner.
- When you’re finished working on a particular song, it is best to use Exit or go directly to another song via Recent Projects. Avoid using your browser’s “back” arrow or closing the browser window. If you do so, BandLab might think you’ve made a mistake and save your changes for you.
- What happens if you accidentally save your changes? Unless you know exactly what you changed, it’s best not to try fixing it yourself. Email Mark (markreppert@gmail.com), and he’ll be able to restore the song to its original version.
The “Two’s a Crowd” Problem
One downside to BandLab is a feature called Live Session, which allows several musicians to work on a single project at the same time. This means that any changes one user makes to a particular Studio page—adjusting volume levels, muting tracks, etc.—will be reflected in real time on the Studio page of every other user working on that song at that moment, regardless of whether the first user saves or not.
Unfortunately, there is no way to turn off Live Session, which means you might be frustrated to have another singer changing the settings you just so carefully adjusted for your practice session.
Here’s how to avoid that conflict:
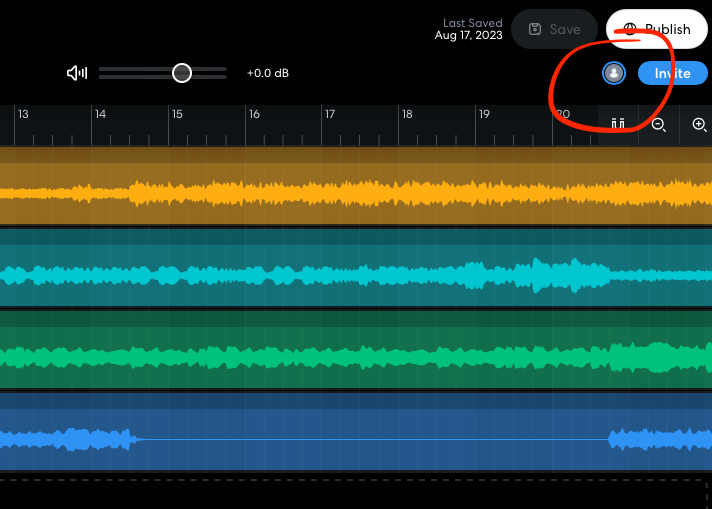
If you go to a Studio page and there is only one User icon in the upper right corner, that means you are the only one practicing this particular song, and you can make all the adjustments you’d like.
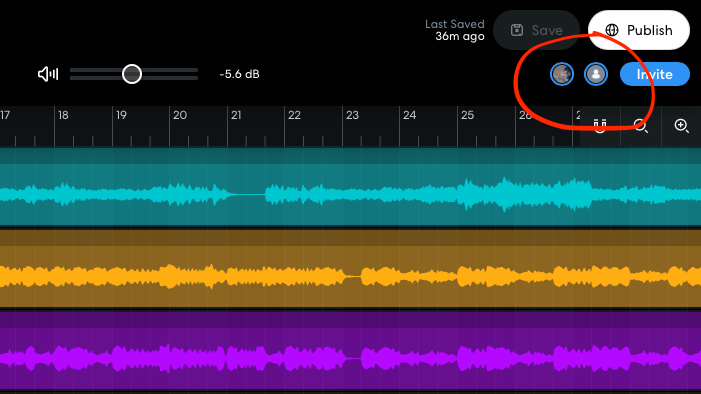
However, if you go to a Studio page and there are two or more User icons in the upper right corner, that means another singer is practicing this particular song, so you should Exit the page.
What should you do if someone beats you to the song you want to work on? There are three possible workarounds:
- You can try working on another song, being careful to note whether someone else is already doing so.
- You can work on an alternate version of the same song, which Mark has labeled with the letter “B.” Again, you’ll need to make sure someone else isn’t already working on that song.
- You can come back at a later time to conduct your practice session.
Note that the heaviest practice times seem to occur on Monday nights and all day Tuesday leading up to that evening’s rehearsal. So plan accordingly.
Questions? Problems? Your tech support staff wants to hear from you. Email Howie (howie.seay@gmail.com) if you’re a Windows user or Michael (michaelzuzel@icloud.com) if you use a Mac.