To record our virtual concerts, we use a web-based application called Soundtrap.

It looks and works the same on Windows and Mac. There are also Soundtrap apps for iOS and Android devices, although they can be more challenging to use.
Unlike rehearsals, when we sing together, Soundtrap allows us to record our own performance when it is convenient, and afterward Mark merges the individual voices into a unified choir.
The Basics
Every song on Soundtrap has its own project page that Mark sets up with guide tracks for each SATB part—similar to the rehearsal recordings he provides us at the start of each season—as well as accompaniment, if any.
You’ll be creating your own track on the page to record your vocal part while singing along with the guide tracks and/or accompaniment.
As each singer adds their recording, you’ll be able to sing along with those as well.
You can re-record your part as many times as you like until you’re satisfied with your performance.
IMPORTANT NOTE: You must use headphones while recording your track. If you don’t, your microphone will pick up the guide tracks and accompaniment, and your recording won’t be usable.
Getting Started
When Mark is ready to have us record a song, he’ll send out an email with a link to the Soundtrap project page. Click the Join the project button to begin
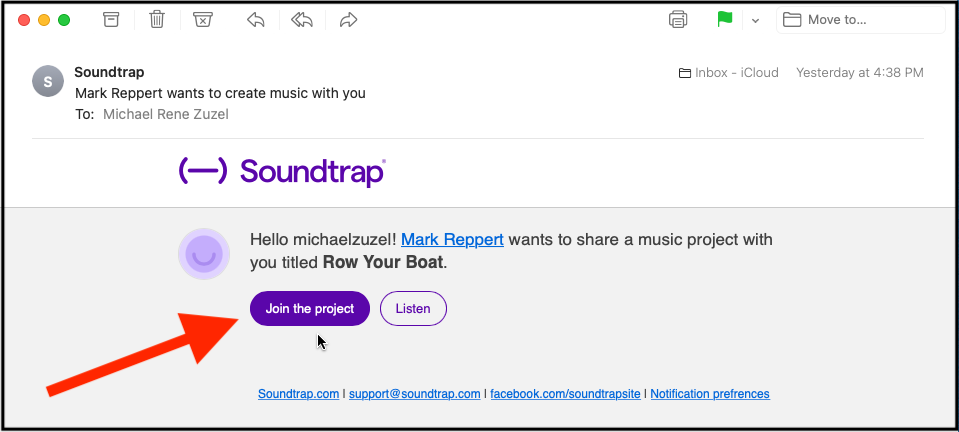
Clicking the button will open your web browser to the Soundtrap site, and this box will pop up.

If this is the first time you’ve used Soundtrap, you’ll need to sign up with the service. (We use the free version, so there is no need to enter payment information at any time.) Sign up with Google, Facebook, or your email address by clicking the appropriate link.
If you have previously used Soundtrap, click on the Already have an account link and sign in.
The Project Page
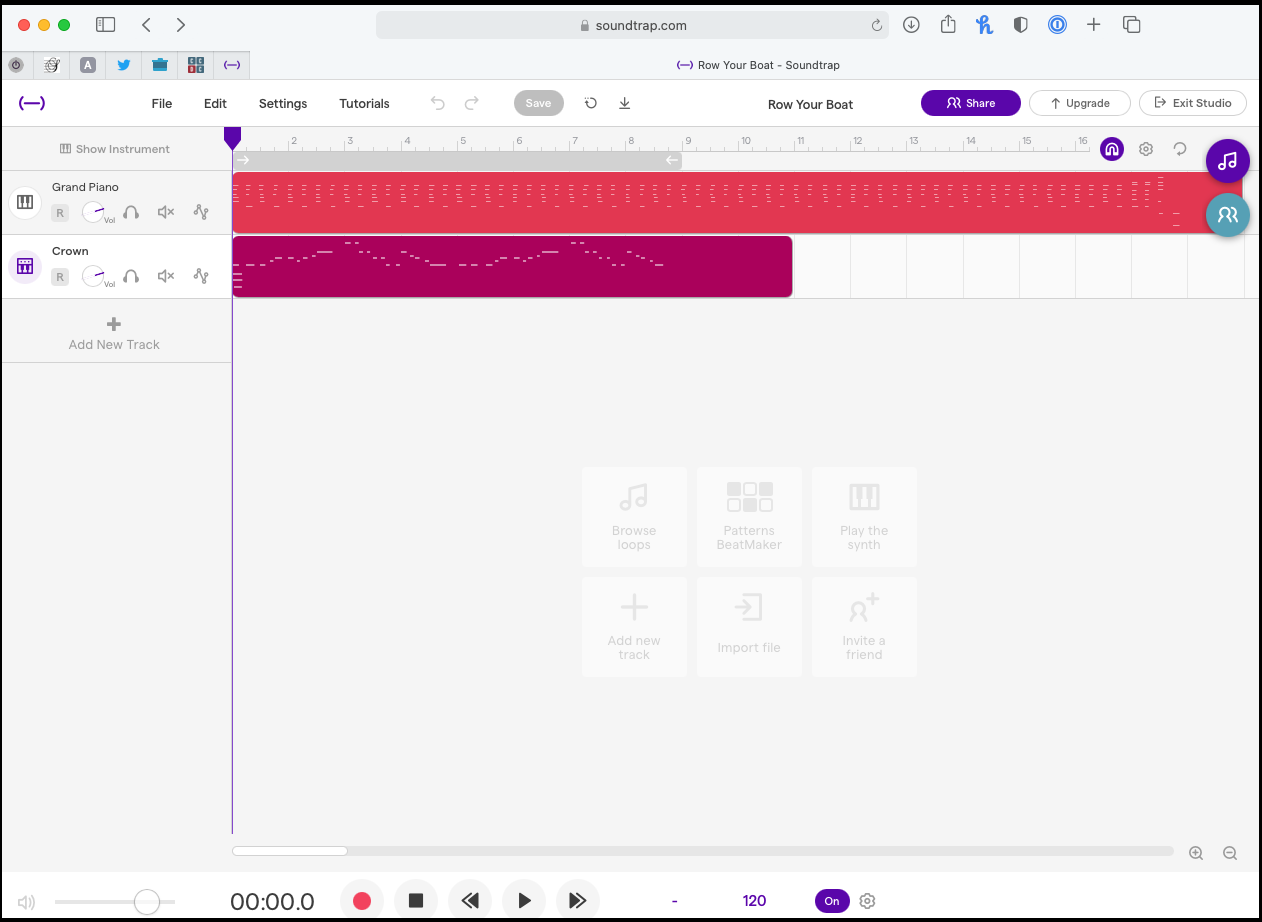
Once you have registered and signed in, you will be taken to the project page for the song Mark wants us to record. It looks like this:
NOTE: If you sign in to Soundtrap without using the link Mark emailed, you’ll be taken to your own user page, which lists all the songs you’re working on. Just click on the Accept button to the right of the song title to be taken to the project page for that song.
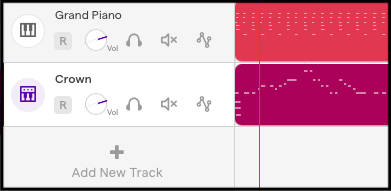
The Soundtrap project page is a visual representation of the song. The purple downward arrow is the “play head,” moving from left to right as the song plays. There is a different colored stripe for each person’s voice. In the left column are the names of the individual tracks; as more people add recordings, more names will appear.
Under each track’s name are controls you can use to customize your recording experience. From left to right, they are:
-
- Record: Don’t ever click this under anyone’s name except your own! It turns RED when clicked, so always make sure the only Red R on the screen is under YOUR NAME.
- Volume: Click and hold on the circle and drag up or down to adjust the volume.
- Solo (headphones icon): Click this to hear only this track and mute all the others (helpful for singing to accompaniment, for example).
- Mute (speaker icon): Click this to mute only this track.
- Pay no attention to the squiggle icon on the right, which accesses features we don’t use.
Along the bottom next to the time display are round buttons for Record, Go to Beginning/Stop, Skip Back, Play, and Skip Forward (in that order), and a Master Volume control on the far left.

Setting Up Your Performance
First, click Add New Track in the left column. A window will appear asking what instrument you’ll be recording; click Voice & Microphones.
If your computer asks for permission to use your microphone, click Allow.
A large red Start Recording button will appear near the bottom of your screen. Don’t click it yet.
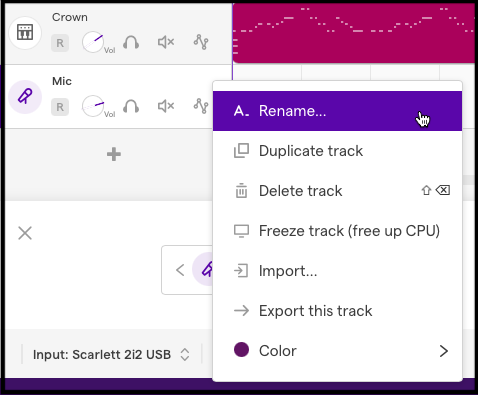
Move your cursor up to the new box that has been added to the bottom of the track list, named Mic. To add your name, hover over the box until three dots appear in the upper right corner. Click and hold, and select Rename from the popup list. Type in your name and your SATB section, and hit Return.
One more thing to do before recording. Below your track box but above the Start Recording button is a strange little icon that looks like a gear overlapping a speaker.
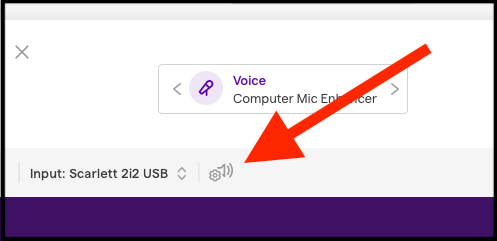
Click on the icon to do a quick microphone check. Sing at the volume your normally would, and Soundtrap will adjust the levels to make sure you’re not too loud or soft.
Now you are ready!
Recording Your Performance
Click the Mute icons in the track boxes along the left for any tracks you do not want to hear while singing.
Make sure you are wearing your headphones, and click the big red Start Recording button.
Soundtrap will give you an eight-beat countdown before the song begins. Sing your part, paying careful attention to tempo, dynamics, cutoffs … you know the drill.
When you are done, click the big Stop button (where the Start Recording button was before).
You can now go back and review your performance. If you want to re-record it, first press the Return to Start button (just to the right of the red dot along the bottom), and click Start Recording again. Note that this will record over your previous performance.
When you are satisfied with your recording, be sure to click the purple Save button near the top.

If at any time you want to re-record again, just sign in to Soundtrap, go to the project page, and click the Red R under your name. Remember to click Save when you are finished.
That’s it! CONGRATULATIONS ON RECORDING A VIRTUAL CONCERT.